

|
Armored rat ogres
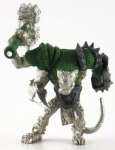
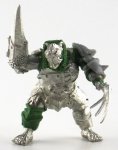
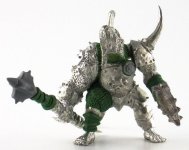
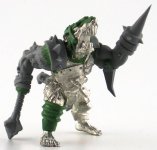
Armored rat ogres are a special unit in a Hell Pit army list, identical to normal rat ogres but with a 5+ armor save and additional hand weapons, which makes them awesome. I knew right away that I wanted to make use of the wide variety of heavily armored figures that are made for WHFB and WH40k, but I also had a clear vision of what I wanted them to look like, so many of the figures I discounted immediately because they were too small, too large, or too difficult to convert. I decided that I wanted them to be barefoot with claws exposed, so that they would clearly be rats. Since their hands are generally replaced by weapons, I wanted another physical feature to distinguish them besides the rat ogre heads. I had a large stock of vehicle armor bitz that I expected to make use of, but it quickly became apparent that they were too large. I wanted a more form-fitting appearance to the armor, not the slapped-on-shields approach, so that the narrow waist and broad shoulders of the rat ogre models would also be apparent. I began an arduous search for generic-looking armor pieces of the right sizes and shapes. GW makes lots of them, but they're all scattered about sprues from dozens of different races from all of their games. Thank goodness for Battlewagon Bits! I also soon realized that I was going to be doing some armor sculpting, but chainmail is easy enough so I wasn't scared off by the prospect. |
|
I had planned on keeping all the rat ogres mostly weaponless, or at least grafting the weapons to arm stumps or making them permanent fixtures to the rat ogres in some way. But I had this arm to the Ogre Kingdoms tyrant model, and I loved the huge hammer head, so I let at least this one rat ogre hold a real weapon in its hand. Maybe because it just killed a tyrant? I also sculpted straps to hold each of the armor pieces on, including some that wrap around the torso. I had some trouble with these because of the torso shape, and I let the green stuff cure too long so it wasn't tacking to the model like I wanted, so instead I sculpted some rings to hold the straps to the figure's back. The same straps are used to wrap the weapon haft, with an extra layer or two to define the pommel. And for a finishing touch, I carved the Skaven symbol into the ironfist. |
|
The knee armor was sculpted using a pointed spatula-type tool. I wrapped the green stuff about halfway around the leg from the front, and kept it fairly thick. Then I took my tool and placed the edge one-third of the way down from the top, at a 45-degree angle, and pressed in while moving it from the center of the leg to one side. I repeated this on the other side. As you push from the front center to the back, you wrap the green stuff around the leg completely, maybe even with a slight overlap in the back. Then I repeated this two-thirds down from the top, again on both sides. That gave me 3 raised ridges and 2 sunken troughs, and if you angled your tool right, the center ridge is V-shaped. The piece of armor is not completely round; it comes to a point at the front. Then take your tool and change the angle to shape the top and bottom raised ridges. The goal is to create two V-shaped sunken troughs with a V-shaped raised ridge in the center. The raised ridges on the top and bottom may be flared out or some other shape, but probably will not be V-shaped on both sides. I then smoothed the troughs out with a rounded burnishing tool, although I could have left them V-shaped instead. |
|
I had planned on keeping all the rat ogres mostly weaponless, or at least grafting the weapons to arm stumps or making them permanent fixtures to the rat ogres in some way. But since I had already deviated from that with armored rat ogre #1 with great success, I tried it again. I don't like this one as much, mostly because my attempts to sculpt wrappings on the haft that matched the existing sculpt aren't up to my standards. I should have completely scrapped the weapon haft for something different. The knee armor was sculpted using a pointed spatula-type tool. I wrapped the green stuff about halfway around the leg from the front, and kept it fairly thick. Then I took my tool and placed the edge one-third of the way down from the top, at a 45-degree angle, and pressed in while moving it from the center of the leg to one side. I repeated this on the other side. As you push from the front center to the back, you wrap the green stuff around the leg completely, maybe even with a slight overlap in the back. Then I repeated this two-thirds down from the top, again on both sides. That gave me 3 raised ridges and 2 sunken troughs, and if you angled your tool right, the center ridge is V-shaped. The piece of armor is not completely round; it comes to a point at the front. Then take your tool and change the angle to shape the top and bottom raised ridges. The goal is to create two V-shaped sunken troughs with a V-shaped raised ridge in the center. The raised ridges on the top and bottom may be flared out or some other shape, but probably will not be V-shaped on both sides. Learning from my first attempt (see armored rat ogre #2), I left the troughs more V-shaped instead of rounding them out. This version of the leg armor came out much better in part because I wasn't trying to shape the armor piece over the top of another thick piece as in #2. |
|
The head armor is actually layered plates on top, with tiny rivets, and hanging leather side pieces. Each plate was sculpted separately and left to cure before starting on the next. The rivets were added last. I wanted something that looked like it might be worn by stormvermin, but more bulky like a rat ogre might be able to carry. I thought about trying to sculpt armor on the sides of the head, or adding a chin strap, but decided on some hanging leather flaps instead. This one gets the grafted weapons en masse, with a spike, a flail, and an elbow spike to boot. I left the original breast emblem intact on this one, but that may change if I find another bit I like. The mismatched shoulder plates fit well, but I don't think that the asymmetry of the weapons would have been enough, and that symmetric armor pieces would have looked better on this model. |
|
I tried using a different tool to sculpt the chainmail over the shoulder where I cut away the second head. It looks okay, but not great, and is distinguishable from the other chainmail beneath. I also tried sculpting my first ever straps with buckles, which worked out really well. Since he had other buckles in the back for his armor, this helps make the new different-looking chainmail look like it belongs. What really pulled this model off, even though it looks a little odd, is the large rat ogre hand that hides the chaos symbol on the belly. Without that hand, this would be a chaos figure for sure. |
|
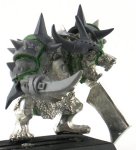
The best bit on this figure is the new orc warboss iron gob face mask, turned upside down and used as armor plating for the rat ogre head with horns. Not only are the horns entirely appropriate on this model, but it fits the contour of the head and around the eyes almost perfectly. It needed only a slight amount of filing away at the ears to get it to fit right, although I could have stuck it on with green stuff instead. The tail was a bit tricky, having to make a serious bend to realistically look like it comes out from under the clothing. There is still sculpting to do on this figure, since I want every piece of armor to have some kind of straps or rivets to show that it is attached somehow to something. I'm also not sure what I'm going to do with the legs. I may try to sculpt some fur down the legs that makes it look more rat-like instead of an ogre wearing a fur coat. But it's already near completion. |
|
|
|
What's next:
|


