


|
Workshop
What can I say? I have the best wife in the world. When we built our house, I got my own den all to myself, which has a nook that is exactly wide enough for my table (which is longer than 5 feet) and the matching 8-drawer cabinet (both purchased on clearance at Pier One Imports; the table was $50). I also got the 11-drawer black cabinet for Christmas, which is on rollers, but I usually keep at my right hand. I've got glass shelves on both sides for current projects and models too tall for my display cabinets. The TV and cable modem have a home in the corner so I can watch movies and listen to music while working. I found that a sturdy, hard-backed chair works better for my posture than softer chairs or stools. When you're working on such small pieces, your tendency is to hunch over, which is very hard on you if you do it for any length of time. I installed a lighting fixture by Architects & Heroes which is a drop-down style of antique lamp. It hangs right over my head, so as not to be in front of my eyes causing me to squint, and I can pull it up or down for more light as needed. This doesn't obviate the need for a good desk lamp, and I use a sturdy flexible arm work lamp with two fluorescent rod bulbs positioned directly over my work. Your lamp is the most important thing on the table, and people who are better painters than I am may suggest particular lamps or bulbs for accurate lighting. Just get one.
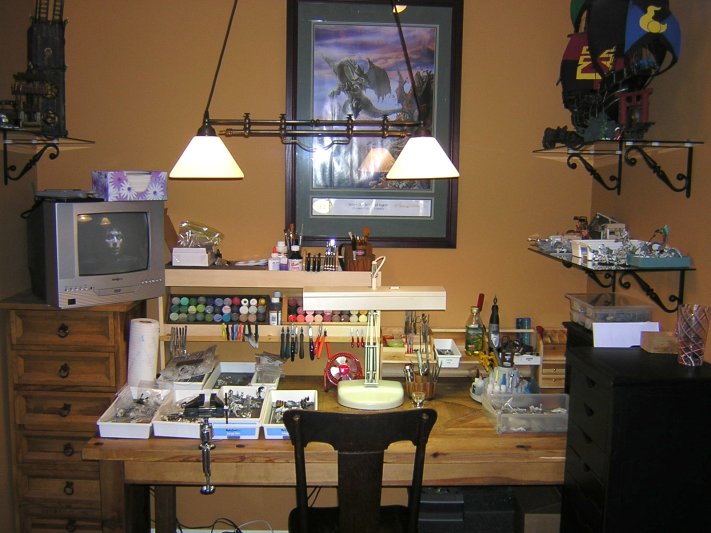 Is that Jesus in my TV? No, I'm watching Dark City. The second most important thing on my table, besides the light, is the fan. Working with bright lights all around you gets hot, and I'd rather not breathe the caustic fumes of cyanoacrylate glue, accelerator, or resin dust. This little fan is $5 at Target and does the job. Below is a detail of the left side of my table. I buy the rubber-bottom shallow storage trays from Walmart for my figures and bitz. The large size works best for large projects like mine. I've got all my plastic rods in one, which fit perfectly if you buy them in the 12" length. I also use the small boxes, which are the same width as the plastic baggies I use for most of my components, so they stack up nicely. This is also the size box that is perfect for holding most tools, including paintbrushes, if you don't have other options. Check out the vise I bought from MicroMark. This is invaluable for holding bitz while I cut on them, file them, or even glue them. I use it often for holding pieces at just the right angle so that gravity doesn't work against me while I'm gluing. Even if I use glue accelerator, some pieces just won't sit on the table without having the glue or accelerator run right off the spot where it needs to be. The vise stays a foot away from me for a reason. I recommend getting a ball swivel vise that you can reposition at many angles for just this reason.
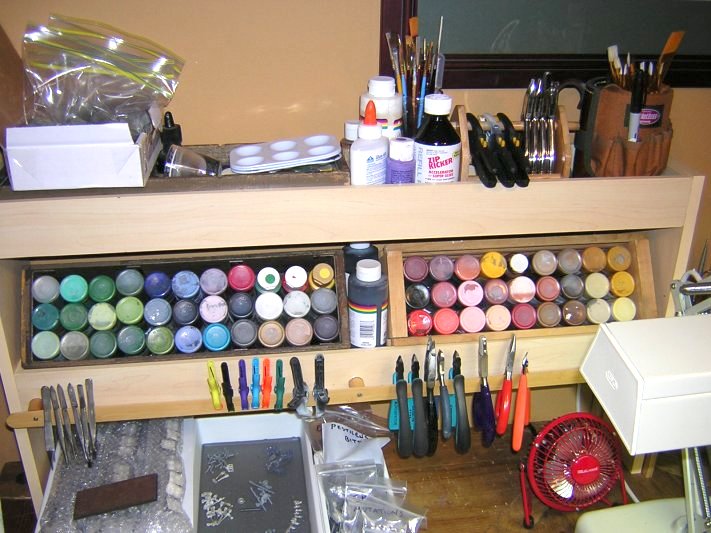
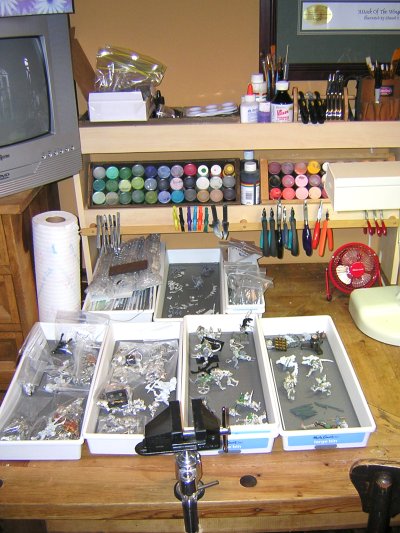 Below is one more close-up of my work area. The really cool shelving unit is from FindingKing and has an open bottom for me to slide my parts boxes under, two shelves with about 2" of depth, and a pliers rack across the front. I still have all my paints in crates, such as CD crates or other similar wooden boxes. My craft paints, which I use a lot for bases and terrain, are propped up at an angle on the shelf's back side. There is another paint box on the top shelf with all my Citadel, Vallejo, Reaper, Coat d'Arms, and Tamiya paints. I've also got my white craft glue, refill of glue accelerator, and paintbrush storage up here. I have a second, removable pliers rack for my wire bending pliers, and a mug with a Bucket Boss brand "Mug Boss" organizer on it. I have several varieties of forceps, although these are the ones I rarely use. I keep some clamps within arm's reach, which I used to use to support figures while glue was drying. Now that I use glue accelerator, I hardly ever use clamps. My pliers and cutters collection is always growing. After keeping one edge-cut pliers long after its useful life, I decided to invest in some good ones. I bought three identical edge-cut pliers on ebay for tough jobs, so that I can go through them with impunity. The jaws are too short for some jobs, though, so I keep my slightly longer old pair about too. I bought a Xuron offset edge-cut pliers, which I use exclusively for plastics, mostly despruing. I don't particularly think the offset cut lives up to its claim of being a closer cut, and would get the normal flush cut pliers next time. I've also got a really old pair of needlenose pliers that don't close correctly, but are the perfect length for tough bending jobs, and another new pair of smooth needlenose pliers for more delicate bending jobs. The most important pair, and the most used, is the nylon jawed pliers. The soft nylon jaws help protect the metal parts from damage while being manipulated, and the jaws can be replaced with they get too dented up. Get yourself a pair of these off ebay, they are a must-have. I've got a set of four wire bending pliers which I bought when I was using more metal rod (the shiny pliers on the top shelf). Finally, hidden behind the lamp in this shot, I have a set of three miniature pliers for grasping small objects with more force than forceps can provide.
 Below is another overview of the right side of my table. On the top glass shelf is a chaos marauder sailing ship that I've been almost done with for a year now, and my works-in-progress Eshin screaming gong. The lower shelf has my works-in-progress rat ogres and jezzails. Under that is a small black storage unit that I keep my bases and some bitz bags in. On top of that are two plastic storage boxes from Menards that I use to organize bitz that are general-purpose. For bitz that are specific to a particular unit or project, I use plastic bags and keep them with the box sets or whatever else is appropriate. You can barely see it, but there is a black plastic magazine file between the short black and tall black cabinets. This is a must, so I can keep the army books and other reference materials that I use handy. I tend to print out pictures of conversions and other ideas from the internet and have them ready. Whenever I get artist's block, I pull out an idea and see what bitz I have available.
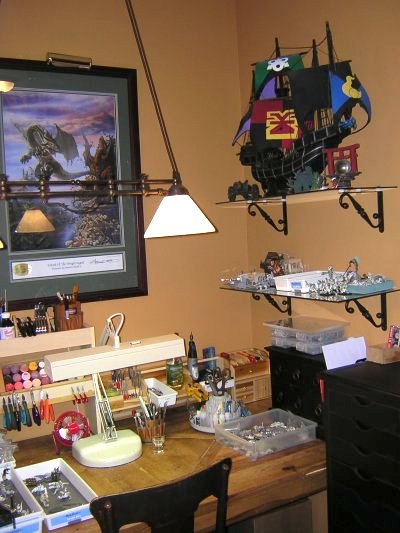 Below is a close-up of this area. I have to comment on the Mug Boss, which I use absolutely constantly. No matter how organized I am, how many storage solutions I have available, nothing beats the convenience of throwing all your tools indiscriminately into a communal mug. The pockets on the sides keep my pin vise drill tips safe and other pointy objects out of harm's way. But all my favorite tools are right there, including my hobby knives, locking forceps, diamond files and rifflers, pin vises pre-loaded with a variety of drill bit sizes, and my glue applicator for tiny jobs (like repairing painted figures). I bought a magnetic tool holder, thinking it would be convenient to just reach out and stick the tool to a place where I could see them all, but I just couldn't find a place to put it where I wouldn't be reaching my arm into a mess of sharp pointy things every time I move. The Mug Boss rules. I also have a rotating artist's tool organizer (which is about $7 at Hobby Lobby or $17 at MicroMark). I used this more before I got my other organizers, and while it worked fine for many tools, I just got too many for this to work for me. It also doesn't hold pliers, boxes of drill bits, a dremel, or many other objects, but the biggest problem with it is that the largest holes are on the outside and are short; the smallest holes are on the inside and are long. For us, our small tools are generally short (the exception being paintbrushes, which this was designed to hold) while the large tools are long. You can see how the long tools on the outside poses a problem. I keep it around for now to store my long rasps, my glue, and my scissors (for cutting off lengths of green stuff).
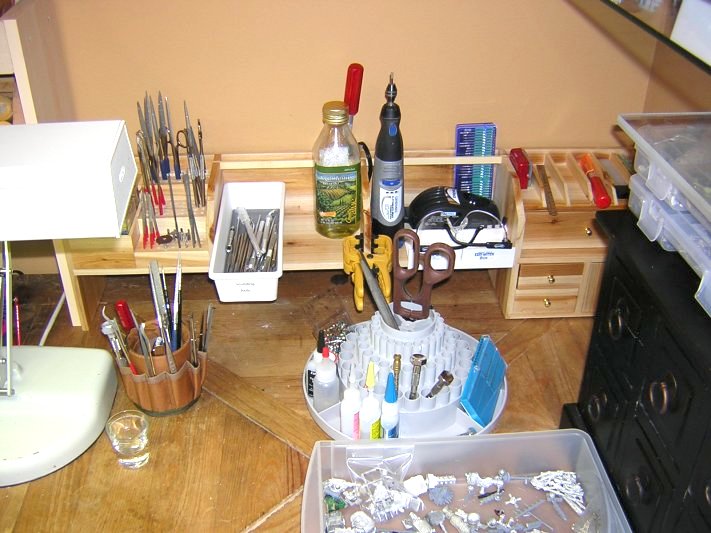 The really cool shelving unit in the above picture is a jeweler's workbench from FindingKing. This one also has clearance at the bottom to slide boxes under. I liked this one for the compartments. On the far left (behind the lamp) is a box where I keep my green stuff and glue applicator tips handy. It came with three levels of pre-drilled holes for 1/8" dremel accessories. I have some dremel accessories in the bottom row, but I used a drill to enlarge the holes elsewhere to keep my many files. I have the standard 7" steel files, but also 10" diamond files, 7" diamond riffler files, and 4" diamond files. Diamond files are cheap on ebay, and they do a great job. You have to learn when to press hard and when to press lighter than the steel files. Sometimes I go back over areas that seem rough with a steel file, especially large obvious areas. The large diamond files are invaluable for cleaning off the slotta tabs or filing a large surface flat, such as a join at an arm, leg, or waist. The tiny files don't get used much, but they are also invaluable at getting the flash out of tiny holes in armpits or cleaning out a hole for pinning. The rifflers are the most important of all. Because all figures have curves, bends, creases, and other non-straight areas, rifflers are a much better choice for getting into these areas. My life has been much simpler since I discovered this. Go get some! You can see this shelving unit also holds a bottle of oil (for smoothing out sheets of green stuff), a box with all my sculpting tools (I found it is just more convenient to keep them this way), my hand saw, dremel and charger, diamond-tipped dremel bit set, miter box, clamps, and safety glasses. The small compartments and drawers on the right hold extra saw blades, hobby knife blades, scalpel blades, a ruler, more dremel accessories, extra pin vise bits, etc. My rear never has to leave the chair more than 6" to lay hands on anything I need. The shot glass is not for drinking. I keep several of them handy, and put water in one for dipping sculpting tools into. When I paint, I'll fill several to rinse brushes in.
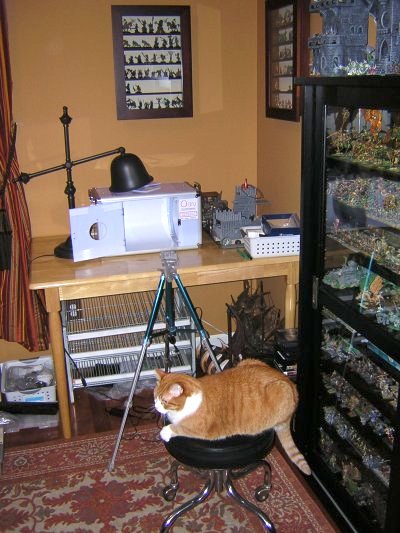 In the opposite corner of the room, I set up another table as my photography workstation. I don't need all this room with my light box and tripod setup, and am planning on getting a different piece of furniture for this corner anyway, so this is temporary. The desk lamp over the light box is part of my lighting experiment. I've got a tray of partially finished vehicles to the right of the light box, some display cabinets on the wall, and underneath the table is another sailing ship that needs some work (maybe a Skaven ship?). The rolling stool I picked up from an optical store that was closing, and it's perfect for doing photography. My cat likes it too.
 Above is my main display cabinet from Home Decorators. It's a 7" deep media storage cabinet with sliding glass shelves. I had a local glass company cut 3 mirrors to fit inside. I also fitted it with lighting, although it's so full right now that the light wouldn't make it past the first shelf, so I kept the original black shelves instead of having glass shelves cut. Top left is Nurgle daemons and mortals, bottom left is Beasts, top right is Khorne daemons and mortals, bottom right is some Confrontation and Ogre Kingdoms, center is Slaanesh and Tzeentch daemons and mortals, with the bottom 2 center shelves being chaos dwarfs. On top, and on the deep window ledge above, I keep some terrain pieces made of Hirst Arts blocks, some dioramas, and some other figures. When building the house, I had the electrician put all of the top outlets onto a switch, so that I could turn on all the display cabinets at once with one switch.
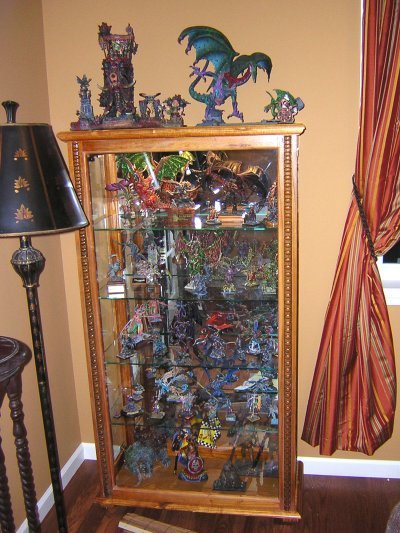 Here is my other display cabinet from Shopko. It came with a mirrored back and glass shelves, and I added lights. This cabinet has side doors about 10" wide and shelves about 13" wide, so it holds the big figures like my Netherlord, ForgeWorld mammoths, bloodthirster, and greater daemon of Slaanesh, as well as most of my favorite painted figures. |

